
The Basic Plastic Injection Molding Process
THE BASIC INJECTION MOLDING PROCESS
The various stages of the injection molding process are carefully considered when analyzing part design, tool creation and efficient production of molded plastic products. There are a lot of factors and configurations which we won’t touch on here but the basic process is the same. Let’s start with the basics.
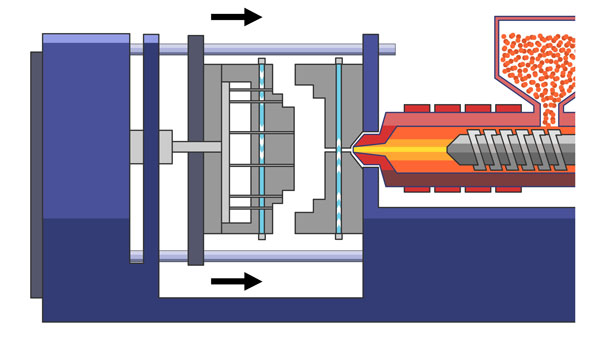
STEP 1: THE MOLD CLOSES
The Injection Molding cycle timer begins when the mold closes.*
*Note: In some cases, as with the use of robots, the cycle runs “part to part” which means the cycle begins and ends when the robot receives a new part or the new part touches the conveyor belt.
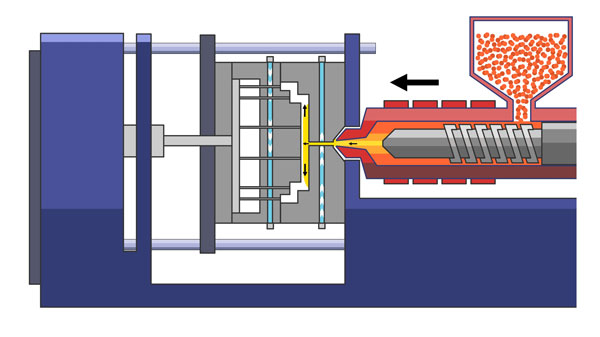
STEP 2: INJECTION
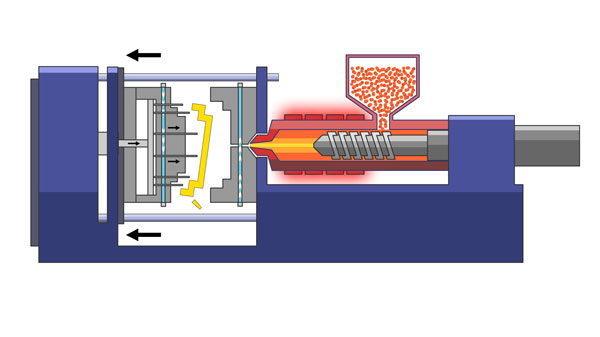
The heated plastic is injected into the mold. As the melt enters the mold, the displaced air escapes through vents in the injection pins and along the parting line. Runner, gate and vent design are important to insure the mold is properly filled.
STEP 3: COOLING
Once the mold is filled the part is allowed to cool for the exact amount of time needed to harden the material. Cooling time is dependent on the type of resin used and the thickness of the part. Each mold is designed with internal cooling or heating lines where water is cycled through the mold to maintain a constant temperature.
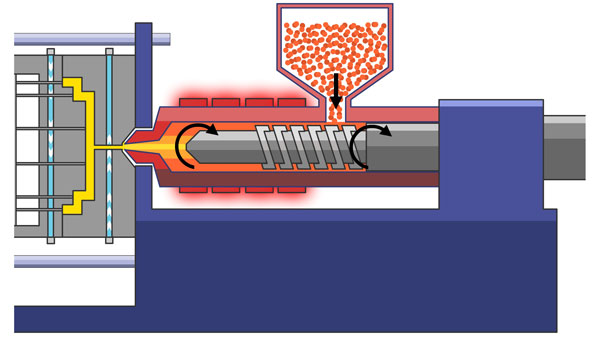
STEP 4: PLASTICIZING THE RESIN
While the part cools, the barrel screw retracts and draws new plastic resin into the barrel from the material hopper. The heater bands maintain the needed barrel temperature for the type of resin being used.
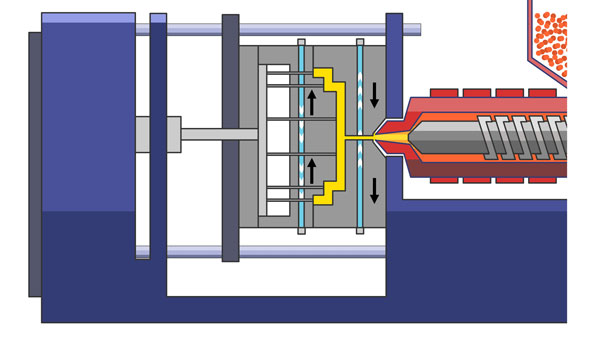
STEP 5: EJECTION
The mold opens and the ejector rod moves the ejector pins forward.
The part falls and is captured in a bin located below the mold.
STEP 6: REMOVING THE RUNNER AND PACKAGING
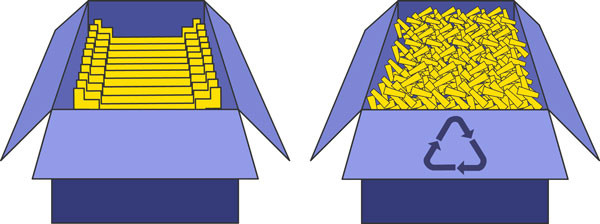
Although the injection molding machine’s cycle ends on Step 5, the process continues. Periodically the machine operators, or robots separate the usable parts from the left over runner.* The runner is the pathway that the plastic takes to fill the mold cavity. In many cases the runners are ground and recycled to reduce costs and environmental impact. The usable parts are then weighed, counted and packaged for assembly or shipping.
*Note: Molds with hot runner systems may not have a runner or waste because the pathway is maintained at a constant heat.
FINAL NOTES
Any unfamiliar terms used in this article can be found in the Aire Plastics Injection Molding Glossary of Terms online at:
http://www.aireplastics.com/glossary-of-terms/
So there you have it, the basic Injection Molding Process. Everyday we work with customers to help them understand the basic process that we are going through to produce quality products. Keeping you, the customer up to date and informed about the basics of how the injection molding process works will help you communicate with your molder. It will also help you understand and troubleshoot any problems he may be dealing with when molding your products.
Injection molding is advantageous over other processes because of the precision and high speed at which products can be made. No other process to date can meet the quality and consistency of this process when molding plastic. If you have any questions please feel free to contact us at contact@aireplastics.com or call at 830-275-0990.
You can find more great info about the Injection Molding Process in by visiting theses links:
http://www.plasticsindustry.org/
https://en.wikipedia.org/wiki/Injection_moulding
https://www.mappinc.com/
Texas Injection Molding
Injection Molding San Antonio, TX
Injection Molding Process
Jason Post
Director of Business Development

Nice job explaining the process. Randall Gavlik. CEO Gavco Plastics Inc. of Broken Arrow Okla